

Learn how to quickly set up a hosted WordPress website with our step-by-step guide for beginners.
WordPress is an extremely powerful and flexible content management system that powers millions of blogs and websites around the world. If you are new to WordPress development, this tutorial will guide you through the process of installing WordPress on your website.
Before you begin
Ask yourself this question… do you really need to do a manual installation?
Many hosting companies offer a simple one-click WordPress installation feature. Before you read any further, log in to your hosting control panel and see if your host offers this service, as this will save you the time and hassle of doing it yourself.
Also, this guide is for hosted WordPress sites. If you are only interested in setting up a blog and you don’t care about having a custom domain name, it may be easier to just create a blog on wordpress.com. If you decide to go down this route, you won’t need to purchase a hosting package and no technical know-how is required. All you need is an email address.
Still determined to install WordPress yourself? Then read on…
Step 1 – Buy a hosting package
If you haven’t already, you will need to purchase a suitable hosting package. There are thousands of hosting companies out there and we could write a lengthy article about choosing the best one, but for the sake of brevity all we’ll say is this – at the very least your hosting company will need to support:
- MySQL
- PHP
- The mod_rewrite Apache module
- HTTPS
You can read more on WordPress’ own requirements page. Purchase your hosting then move on to step 2…
Step 2 – Download the WordPress core files
Simply go to wordpress.org/download and hit the download button. This will download a zip folder containing the core collection of files needed to make WordPress work. It’s recommended that you always do a ‘fresh’ download for every new site you create, as WordPress is frequently updated.
Step 3 – Create a database
The next thing you will need to do is create a new MySQL database. Log in to your hosting control panel (this will look different depending on the hosting provider) and look for an option that either says “MySQL”, “Databases” or something similar. Create a new database and make a note of the database name, username, password and hostname, as you will need these later.
Step 4 – Edit the wp-config file
Unzip the WordPress files you downloaded earlier and look for a PHP file called “wp-config-sample”. Open the file up in a text editor and look for the following lines of code:

Enter the details you noted down earlier. Save the file in the same location and rename it “wp-config” (not “wp-config-sample“).
Step 5 – Upload the files to your server
You can do this two ways – via your hosting company’s file manager, or through an FTP application such as Filezilla.
If you want your blog to live in a separate area of your site (e.g. www.mysite.com/news), create a folder with the appropriate name (in this example “news”) and upload the files into that folder. Otherwise, upload the files directly into the main public_html folder.
Upload everything that was in the “wordpress” folder, including your newly created wp-config file.
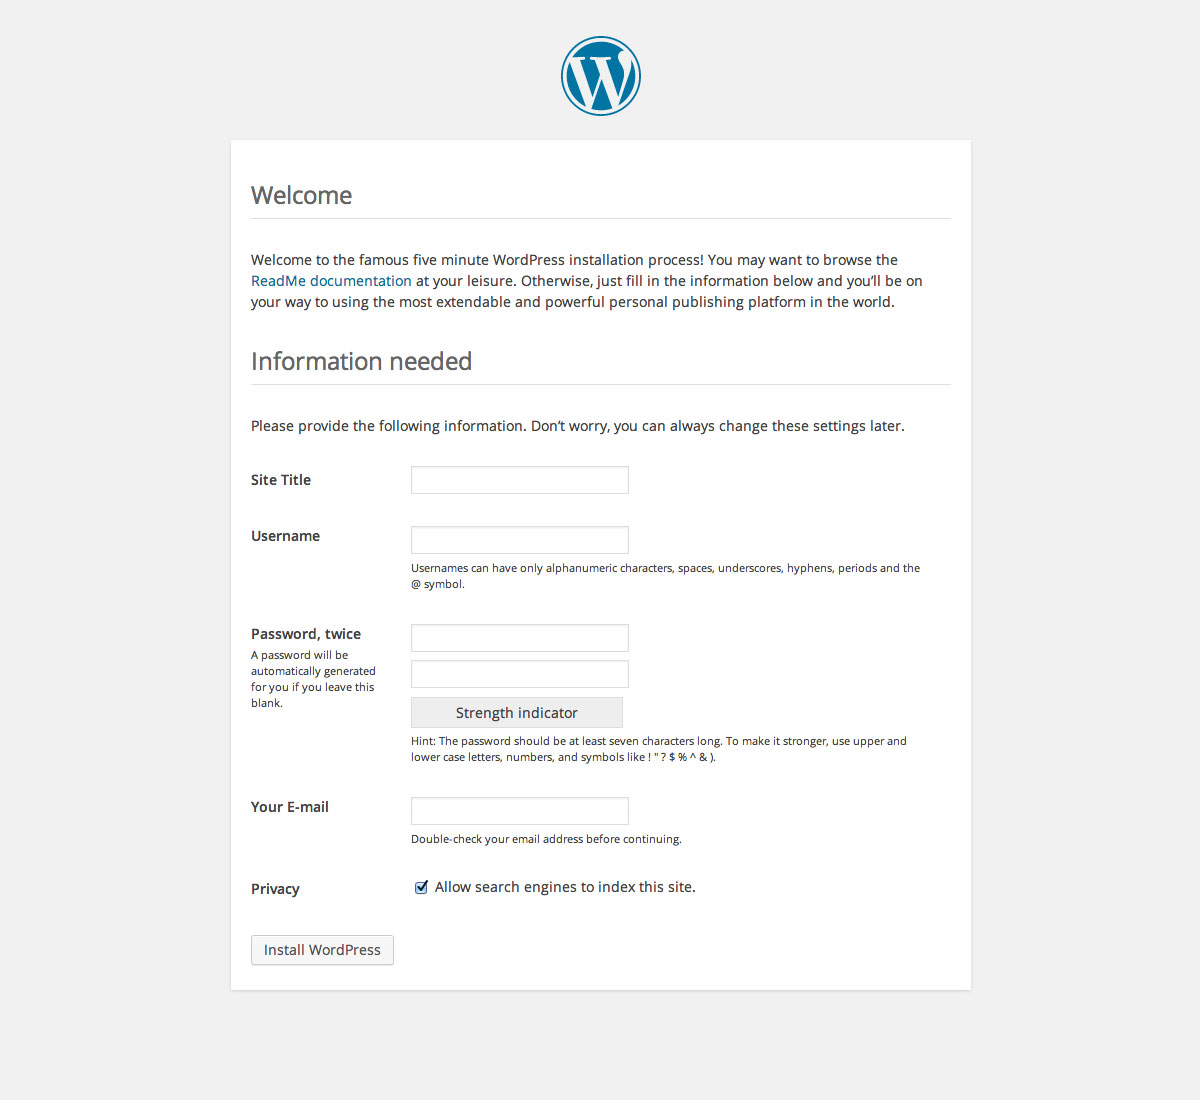
Step 6 – Configure your WordPress site
Open up your web browser and visit your website (or the sub-folder where you blog will live). If everything has worked, you should see a welcome screen that looks something like this:
If something has gone wrong, you may see an error message with instructions on how to fix it. Nine times out of ten there is a mistake in the wp-config file that is preventing WordPress from connecting to your database. Double-check your wp-config file and try re-uploading it. If you are still running into trouble, WordPress has an extensive support forum that probably has the answer.
If everything has gone smoothly, just enter your details and away you go!
Accessing your WordPress dashboard
One final note – when you need to go back in and edit your WordPress site, simply go to mysite.com/wp-admin/, where you will be prompted to enter your username and password. This will take you to your dashboard, where you can write new posts, customise your theme and alter other settings.
Did we miss anything out?
If you are an experienced developer, why not share your tips and advice in the comments!